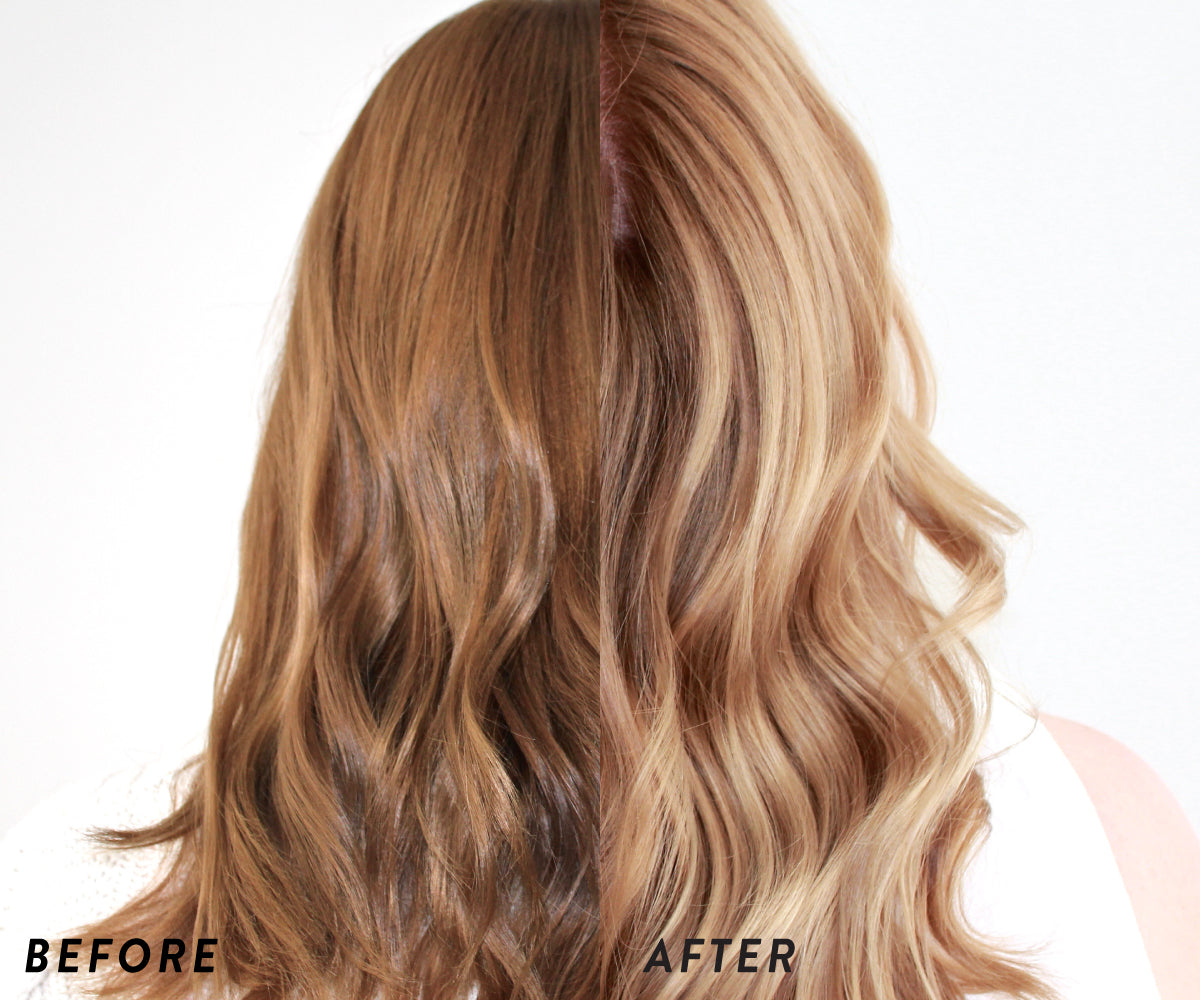
I am a seasonal Colourer and recognised that familiar itch for change once Spring entered the building. After a Winter spent as a Salted Caramel Blonde, the Colour mixer I fell in love with the minute I learnt of its creation, I was excited to develop my familiar Hair plan back to a Light Blonde with the guidance of a My Hairdresser Colour Consultant. Keep scrolling to join me on my journey.
Step 1.
We are blessed with having the best-in-the-biz at our disposal in the My Hairdresser Colour Consultant Team. My Colour Consultant — Hanna — took some time to ask me my Colour goals so we could work out my Colour plan before I began:
Current Colour: Salted Caramel Blonde.
Natural Colour: 7 Medium Blonde.
Hair Thickness: Thick.
Colour goal: I want to be a Light Blonde, I said around an 8 Light Blonde, with a nice pearl finish. My Hair grows really fast and I want my Colour to be as low maintenance as possible, so I like a Darker Blonde at my roots and Light Blonde through my ends so I’m not staring a Regrowth line every 2 weeks. I also want to paint some casual Highlights through my Hair, like little flashes of Light.
Step 2.
As you would expect, my first stop was at the Colour Remover station to clean out my Salted Caramel. I love Colour Remover, it’s quick and painless while you watch your Hair change like a mood ring, right in front of your eyes. Hanna, my Colour Consultant, and I agree that it would be for the benefit of my Hair to do two Colour Removers to give my Hair a cleanse and a decent refresh.

I applied my first Colour Remover and was happy with the results. My SC had all but been removed, leaving me with a consistent and Lighter Colour than I expected. I wasn’t in a rush, so I left my Hair overnight before Colour Removing again.

I applied my second coat of Colour Remover, this time with an applicator bottle to get the job done quickly. (see: the difference between my Colour Removed Hair and Regrowth.)

Products Used: Colour Remover, Tint Bowl and Brush, Sectioning Clips, Applicator Bottle.
Step 3.
Post Colour Removing, I waited the full 48 hours before Colouring. I decided to break up my Colour in two applications — Highlights and Regrowth — to make my life easier.
Not one for a formal foiled Highlights, I roped in some help from a fellow home Colourer, with whom I take turns of doing each other's Hair, with who free handed some small Highlights through my Hair.
We kept my Highlights high in the front and around my face, starting anywhere from 1cm to 3cms off my part, then lower and fewer through the back of my Hair, staggering the start line for a softer regrowth line. I, clumsily, used cut up strips of foil to seperate each Highlight from my un Coloured Hair.
Hanna chose my Highlight Colour mixture, 10.2 Very Light Beige Blonde + 30 Volume Developer because it fit in with the “pearly” Blonde look I was going for and a Cool Colour to help deal with some of the Warmth that was left over after Colour Remover.

Products Used: 10.2 Very Light Beige Blonde with 30 Volume Developer, Sectioning Clips.
Step 4.
Lastly, to my roots! I adore Beige and seem to keep returning to it. 8.2 Light Beige Blonde is the Colour lightness I was looking for with that same iridescent Colour I had used for my Highlights. Plus, Beige is a Cool Colour pigment that can neutralise my Warmth I throw Naturally and have from Colour Removing.
I applied my 8.2 Light Beige Blonde and 20 Volume Developer Colour mix to my Regrowth and painted it down to the start of my Highlights. I tried to include a few Low Lights that I tapered down to add to the Natural style I am looking for. After covering my entire Regrowth, I left my Hair to develop.
Once I hit the 15 minutes to go mark, I mixed together 10.2 Very Light Beige Blonde and No Lift Developer mixture that I painted through my ends that needed a Tone and make sure my entire Hair has the same creamy, pearly Colour.
Products Used: 8.2 Light Beige Blonde with 20 Volume Developer. 10.2 Very Light Beige Blonde with No Lift Developer.
Step 5.
My final step, and probably the best tip that Hanna gave me, was to use a wide tooth comb to comb through my Hair once I had all my Colour mixtures on and processing. She assured me that this would blend my Hair into a smooth, milky Colour. Guess what? She was 100% right.


